
Survival Tools
A more enjoyable way to play Minecraft!
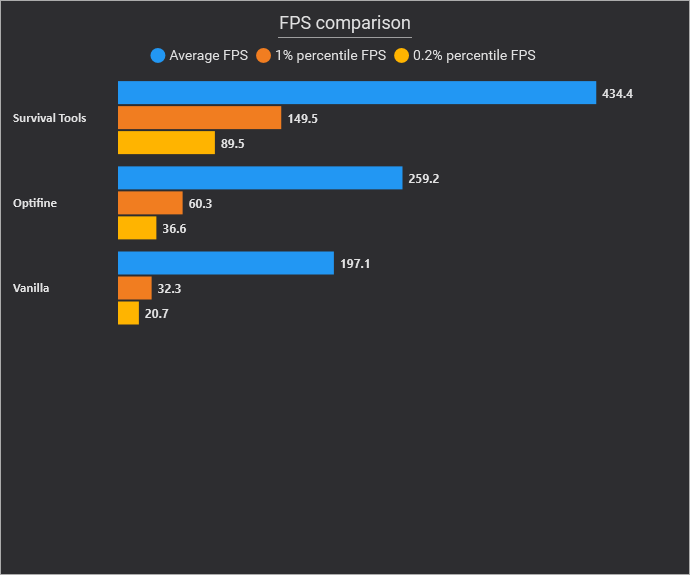
Screenshots


About this Modpack

About
This modpack mainly focuses on the client side of Minecraft. Making improvements where it's needed while keeping it "Vanilla". In my opinion, I find it a more enjoyable way to play Minecraft.Features
- Game Optimizations
- Improved visuals\audio
- Useful tools
Why Survival Tools
What sets this modpack apart from all the other optimization/vanilla+ modpacks?
This modpack is specifically aimed toward people who play Minecraft survival. With features focused on improving the survival experience both in single and multiplayer.
Other modpacks sometimes compromise visual and gameplay aspects that are useful in survival to (in some cases) increase performance. This modpack on the other hand actually adds to the survival experience. Adding useful features such as better tooltips, schematics, freecam and lots more.
With over 60k+ downloads on Curseforge, this modpack has everything you need for your survival world!
Credits
Sponsor
Thank you
Available Versions
How to Set Up a Survival Tools Server
Order Server
Choose at least 4 GB RAM (6 GB recommended for Survival Tools). Based on player count: per 8 players.
Install Modpack in Dashboard
Open the modpack browser in the dashboard, search for "Survival Tools" and click "Install". The quilt loader and Minecraft 1.20.1 are configured automatically.
Start Server & Play
Start the server – all mods are loaded automatically. Share the server IP with friends and play together!
Frequently Asked Questions
Survival Tools server crashes or won't start – what to do?
Most common causes: insufficient RAM or wrong quilt loader. Check latest.log for "OutOfMemoryError" → increase RAM to at least 6 GB. For "Mixin" or "ClassNotFoundException" errors: modpack version and loader don't match. With Mado Hosting, loader and Minecraft version are auto-configured on modpack install – preventing most startup issues.
How much RAM does a Survival Tools server really need?
Minimum 4 GB, recommended 6 GB for stable performance. per 8 players. Important: Minecraft modpacks need more RAM than vanilla – plan extra per additional player. With Mado Hosting, you can scale RAM up live at any time without data loss (from €8/month).
Can I add custom mods to Survival Tools without conflicts?
Yes, but check compatibility: only use mods for the same loader (quilt) and same Minecraft version (1.20.1). Common issues: ID conflicts with recipe mods and incompatible coremod versions. The Mado dashboard mod browser only shows compatible mods and warns about known conflicts.
Survival Tools server lagging – performance tips
1) Increase RAM to 6 GB+. 2) Reduce server view-distance to 8 (server.properties). 3) Pre-generate chunks with the "Chunky" plugin. 4) Use /spark profiler to check which mods consume the most tick time. With Mado Hosting, all servers run on NVMe SSDs with dedicated CPU cores – eliminating hardware as a bottleneck.
Similar Modpacks
Rent Survival Tools Server
Start your own server with automatic modpack installation.
Supported Versions
Start your Survival Tools Server now
From €8.00/month with 6 GB RAM for the best performance.
Configure Server →